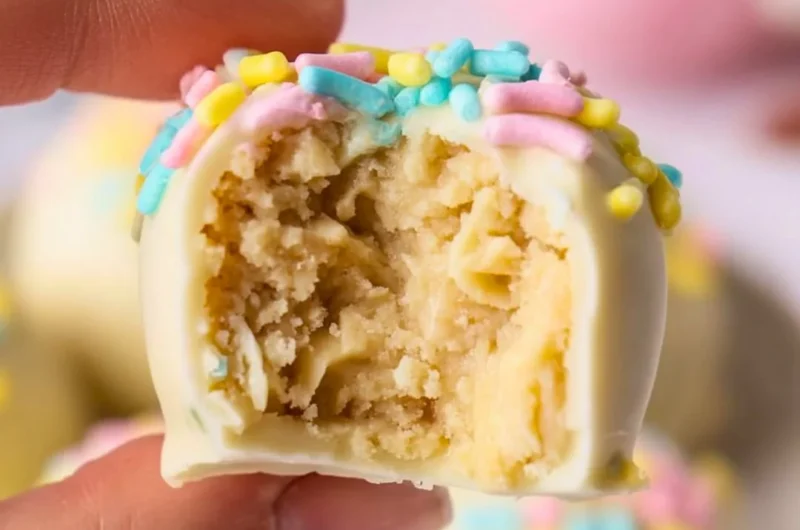
Banana Pudding Easter Truffles: A Cozy, Sweet Treat for Your Celebrations
As Easter approaches, the scent of freshly baked goods and the cheerful chatter of family gatherings fill the air, creating a sense of warmth and joy that’s simply irresistible. Among all the delightful treats that grace our tables during this season, Banana Pudding Easter Truffles hold a special place in my heart. With their creamy, indulgent flavor and the nostalgic crunch of vanilla wafers, these truffles evoke cherished memories of family picnics and sunny afternoons spent enjoying sweet desserts.
What I love most about these truffles is how effortlessly they can bring happiness to your Easter celebrations. Perfect for sharing with loved ones or indulging in yourself, they are a quick and easy no-bake dessert that fits beautifully into any festive occasion! Trust me, this is one you’ll definitely want to pin for later!
Why You’ll Love This Recipe
- No-bake simplicity: Whip them up in no time with minimal fuss and bother.
- Creamy & dreamy: With a delicious banana pudding filling, these truffles are an indulgence you won’t want to miss.
- Family-friendly: They’re easy enough for little hands to help out, making for a fun family activity!
- Perfect for Easter: These truffles are a delightful addition to your Easter celebrations or springtime gatherings.
- Customizable: With endless flavor variations and toppings, you can make each batch uniquely yours!
What You’ll Need
Gather These Simple Ingredients
- 1 cup banana pudding mix
- 2 cups milk
- 1 cup whipped cream
- 1 cup crushed vanilla wafers
- 1/2 cup chocolate chips
- 1 teaspoon vanilla extract
- Cocoa powder or powdered sugar for dusting
Let’s Make It Together
In a mixing bowl, whisk the banana pudding mix and milk until smooth. The creamy mixture should have a heavenly, silky texture that promises sweet delights.
Fold in the whipped cream gently until everything is combined, creating a light, airy mixture that embodies the essence of banana pudding.
Stir in the crushed vanilla wafers and vanilla extract, bringing in that satisfying crunch and inviting aroma that will surely make your mouth water.
Refrigerate the mixture for about 30 minutes to firm up, so it’s easier to work with—we want these truffles to have that perfect bite!
Once stiff, scoop out small portions of the mixture and roll them into balls, about the size of a golf ball. The fun part is taking your time to make them just right!
Dip each ball in melted chocolate and place them on a parchment-lined tray. As the chocolate coats the truffles, you’ll enjoy the sweet tableau as they start to come together.
Dust with cocoa powder or powdered sugar before serving, and get ready for the delightful surprise when each bite reveals its rich, creamy center.
Chill again until set, then enjoy these heavenly treats as part of your Easter celebrations!
Variations & Creative Twists
Delicious Variations to Try
Chocolate Banana Truffles: Add cocoa powder to the pudding mix for a richer chocolate experience, turning these truffles into a delightful chocolate banana combo that is simply indulgent!
Nutty Twists: Fold in crushed nuts such as walnuts or pecans for a zesty crunch that brings both texture and flavor.
Fruity Fun: Add a layer of fresh banana slices inside before coating them in chocolate for an even more delightful flavor explosion.
Colorful Sprinkles: Roll the dipped truffles in colored sprinkles before chilling them—they’ll look beautiful and festive on your Easter table!
Chef Emma’s Helpful Tips
Make-ahead: You can prepare the truffle mixture a day in advance; just store it covered in the refrigerator until you’re ready to roll and dip.
Storage: Keep your truffles in an airtight container in the fridge; they’ll last for about a week (if they last that long!).
Experiment with Toppings: Try using white chocolate or a mix of chocolate varieties for a more visually stunning treat, and feel free to top them off with crushed pretzels or graham crackers for an added crunch!
Serve it Warm: If you want that delicious melted chocolate experience, serve these truffles just after coating in warm chocolate, creating a decadent dessert unlike any other.
Nutrition Information per Serving
- Serving Size: 1 truffle
- Calories: 150
- Carbohydrates: 20g
- Sugar: 12g
- Fat: 7g
- Protein: 2g
- Sodium: 50mg
Frequently Asked Questions
Reader FAQs About Banana Pudding Easter Truffles
Can I make this ahead? Yes! You can prepare the filling a day in advance and keep it in the refrigerator until you’re ready to roll the truffles.
Can I use different ingredients? Absolutely! Feel free to swap the vanilla wafers for graham crackers or try different chocolate varieties for dipping.
How do I store leftovers? Keep any leftovers in an airtight container in the refrigerator to keep them fresh and delicious.
How long does it last? These truffles stay good for about a week in the fridge, but I doubt they’ll last that long—everyone will want to gobble them up!
Wrapping It Up
Banana Pudding Easter Truffles are more than just a treat; they’re a celebration of sweetness, family, and nostalgia. Perfectly creamy with a delightful crunch, these delightful bites capture the very essence of Easter warmth and joy. Whether you’re enjoying them at a family gathering or simply indulging on your own, they’re guaranteed to bring a smile to your face. So save this Banana Pudding Easter Truffles recipe to your springtime dessert board, and let the celebration shine on! Happy baking!
Print
Banana Pudding Easter Truffles
- Total Time: 45 minutes
- Yield: 24 truffles 1x
- Diet: Vegetarian
Description
Delightful no-bake truffles filled with creamy banana pudding and crunchy vanilla wafers, perfect for Easter celebrations.
Ingredients
- 1 cup banana pudding mix
- 2 cups milk
- 1 cup whipped cream
- 1 cup crushed vanilla wafers
- 1/2 cup chocolate chips
- 1 teaspoon vanilla extract
- Cocoa powder or powdered sugar for dusting
Instructions
- In a mixing bowl, whisk the banana pudding mix and milk until smooth.
- Fold in the whipped cream gently until combined.
- Stir in the crushed vanilla wafers and vanilla extract.
- Refrigerate the mixture for about 30 minutes to firm up.
- Once stiff, scoop out small portions and roll them into balls.
- Dip each ball in melted chocolate and place them on a parchment-lined tray.
- Dust with cocoa powder or powdered sugar before serving.
- Chill again until set, then enjoy!
Notes
These truffles can be made a day ahead and stored in the fridge. Enjoy experimenting with toppings!
- Prep Time: 15 minutes
- Cook Time: 0 minutes
- Category: Dessert
- Method: No-Bake
- Cuisine: American
Nutrition
- Serving Size: 1 truffle
- Calories: 150
- Sugar: 12g
- Sodium: 50mg
- Fat: 7g
- Saturated Fat: 4g
- Unsaturated Fat: 3g
- Trans Fat: 0g
- Carbohydrates: 20g
- Fiber: 1g
- Protein: 2g
- Cholesterol: 15mg